Test a Native Android App with Appium and WebdriverIO: Part 2
Photo by Matam Jaswanth on Unsplash
Creating Test Data
The first step we will take to test the application is creating test data test/data/user.ts to use for the login and profile screens:
export const loginCreds = {
  username: 'test user',
  password: '12345',
}

export const profileInfo = {
  country: 'usa',
  address: '123 street',
  email: 'test@mail.com',
  phone: '1234567890',
}
In the previous code, we created a loginCreds object with data to use for the login screen and a profileInfo object to use in the profile screen. Next, we will import the test data objects in the page objects that we will create later.
Inspecting Elements via Appium Desktop
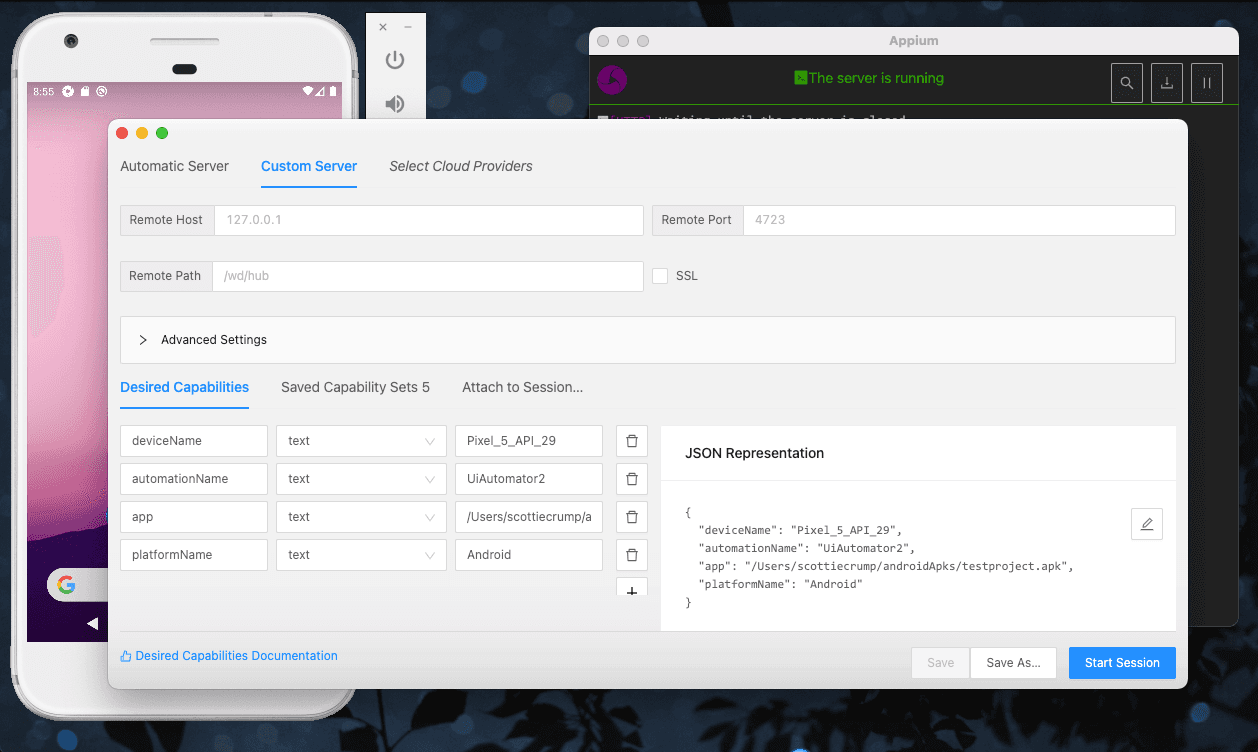
We can open the app using the Appium Desktop application and an emulator we installed in the "Installing Appium" section of Part 1 to inspect elements and determine which selector strategy to use. Once we start the Appium Desktop application, we can click the "Start Inspector Session" icon and enter the desired capabilities for the device (i.e., "deviceName", "automationName", "app", and "platformName") similar to what we have in our config files:
Then, once we click the "Start Session" button, we can select any screen element:
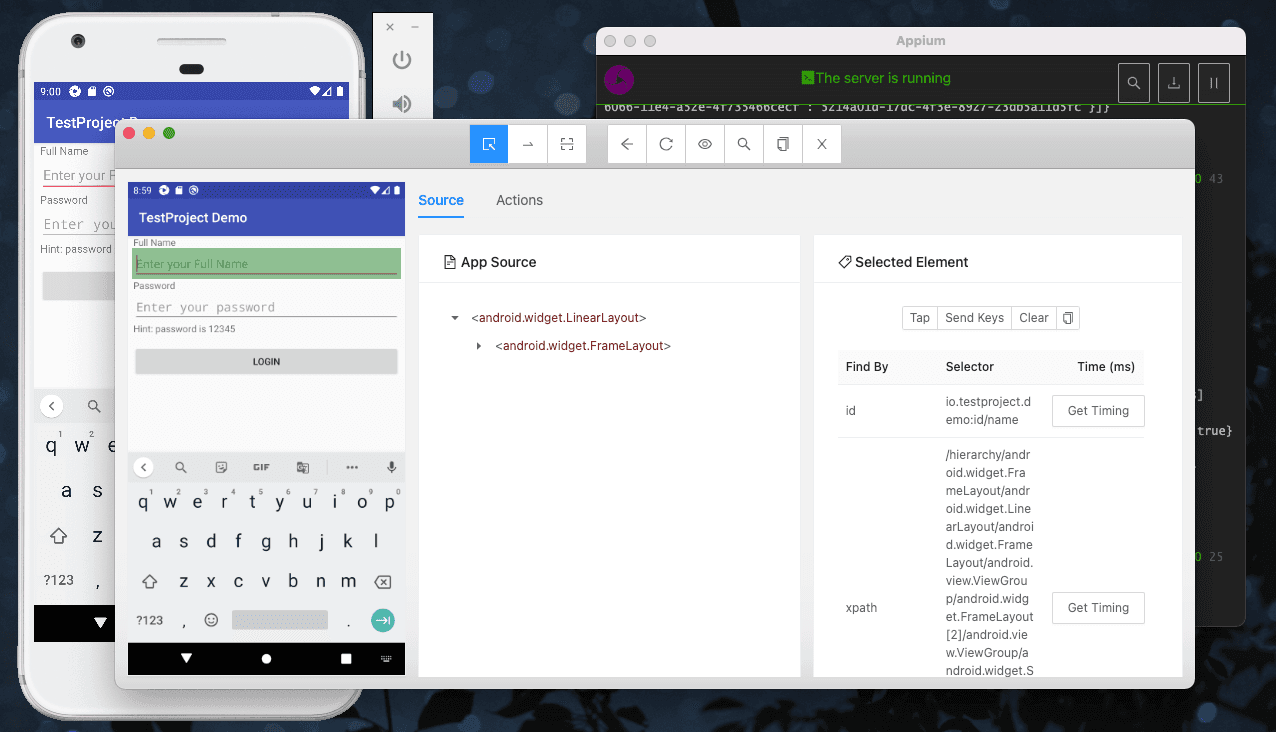
In the previous screenshot, we selected the "Full Name" input, resulting in id and xpath being the two best options to choose the element under the column "Find By." In the next section, we will use the id to select screen elements when creating page objects.
Creating Page Objects
We will use the Page Object Design (POM) pattern to abstract the WebdriverIO framework code from our test code resulting in cleaner-looking tests. We will start by creating a base page class test/pageObjects/page.ts that other page classes can use to inherit its methods:
export default class Page {
  protected _getByResourceID(id: string): ChainablePromiseElement<Promise<WebdriverIO.Element>> {
    return $(`android=new UiSelector().resourceId("io.testproject.demo:id/${id}")`)
  }
}
In the previous code, we created a protected method, _getByResourceID, that accepts an id and uses the UiSelector class from the Android Automator API to select screen elements based on the resourceID. The design of the app allows for using the resourceID for element selection. Next, we will create a page object class for the login screen:
class LoginPage extends Page {
  private get inputUsername(): ChainablePromiseElement<Promise<WebdriverIO.Element>> {
    return this._getByResourceID('name')
  }

  private get inputPassword(): ChainablePromiseElement<Promise<WebdriverIO.Element>> {
    return this._getByResourceID('password')
  }

  private get btnSubmit(): ChainablePromiseElement<Promise<WebdriverIO.Element>> {
    return this._getByResourceID('login')
  }

  public async login(username: string, password: string): Promise<void> {
    await this.inputUsername.setValue(username)
    await this.inputPassword.setValue(password)
    await this.btnSubmit.click()
  }

  public async isLoginBtnDisplayed(): Promise<boolean> {
    return await this.btnSubmit.isDisplayed()
  }
}
We create a LoginPage class in the previous code that extends the Page class. The class contains three getter methods (inputUsername, inputPassword, and btnSubmit) to access screen elements. Then, we create a login method to perform actions on the screen elements accessed by the getter methods. Finally, we create a method to verify the login button is displayed, isLoginBtnDisplayed. The last page object class will be the profile screen:
class ProfilePage extends Page {
  private get inputCountry(): ChainablePromiseElement<Promise<WebdriverIO.Element>> {
    return this._getByResourceID('country')
  }

  private get inputAddress(): ChainablePromiseElement<Promise<WebdriverIO.Element>> {
    return this._getByResourceID('address')
  }

  private get inputEmail(): ChainablePromiseElement<Promise<WebdriverIO.Element>> {
    return this._getByResourceID('email')
  }

  private get inputPhone(): ChainablePromiseElement<Promise<WebdriverIO.Element>> {
    return this._getByResourceID('phone')
  }

  private get btnSave(): ChainablePromiseElement<Promise<WebdriverIO.Element>> {
    return this._getByResourceID('save')
  }

  private get btnLogout(): ChainablePromiseElement<Promise<WebdriverIO.Element>> {
    return this._getByResourceID('logout')
  }

  private get bannerSaved(): ChainablePromiseElement<Promise<WebdriverIO.Element>> {
    return this._getByResourceID('saved')
  }

  public async enterProfileInfo({
    country,
    address,
    email,
    phone,
  }: {
    country: string
    address: string
    email: string
    phone: string
  }): Promise<void> {
    await this.inputCountry.setValue(country)
    await this.inputAddress.setValue(address)
    await this.inputEmail.setValue(email)
    await this.inputPhone.setValue(phone)
    await browser.hideKeyboard()
    await this.btnSave.click()
  }

  public async logout(): Promise<void> {
    await browser.hideKeyboard()
    await this.btnLogout.click()
  }

  public async isBannerSavedDisplayed(): Promise<boolean> {
    return await this.bannerSaved.isDisplayed()
  }
}
We create a ProfilePage class in the previous code that extends the Page class. The class contains four getter methods for inputs (inputCountry, inputAddress, inputEmail, and inputPhone). Then, we create getter methods for the save and logout buttons. Finally, we create a getter method for the saved banner. Next, we create a enterProfileInfo, logout, and isBannerSavedDisplayed method to perform actions on the screen elements. We will use our page object classes to create a test case in the next section.
Testing the Update Profile Flow
For our test case, we will verify that a user can save new profile information:
describe('Update Profile', () => {
  it('should allow a user to save new profile information', async () => {
    await LoginPage.login(loginCreds.username, loginCreds.password)
    await ProfilePage.enterProfileInfo(profileInfo)
    await ProfilePage.isBannerSavedDisplayed()
    await ProfilePage.logout()

    expect(await LoginPage.isLoginBtnDisplayed()).toBeTruthy()
  })
})
In the previous code, first, we log in using the username and password from our test data. Next, we enter profile information on the profile screen using our test data. Then, we verify the "saved" banner is displayed on the screen. After saving our data, we log out of the application. Finally, we assert the "login button" is displayed.
In our package.json, we have a script to run the test:
"wdio": "wdio config/wdio.android.app.conf.ts"
When we run the test from the command-line with npm run wdio, the test passes:
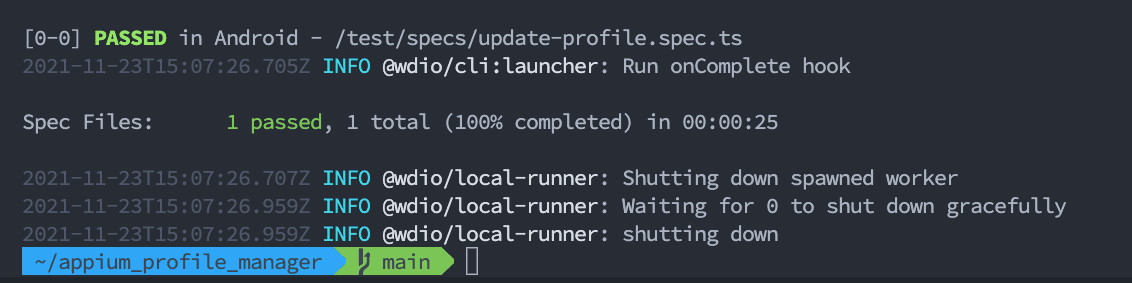
The previous screenshot indicates the test ran and passed in 25 seconds.
We can also have another package.json script to view a report after each test run:
"report": "allure generate allure-results && allure open"
When we run the script from the command-line with npm run report we open the report located in the auto-generated "allure-report" folder:
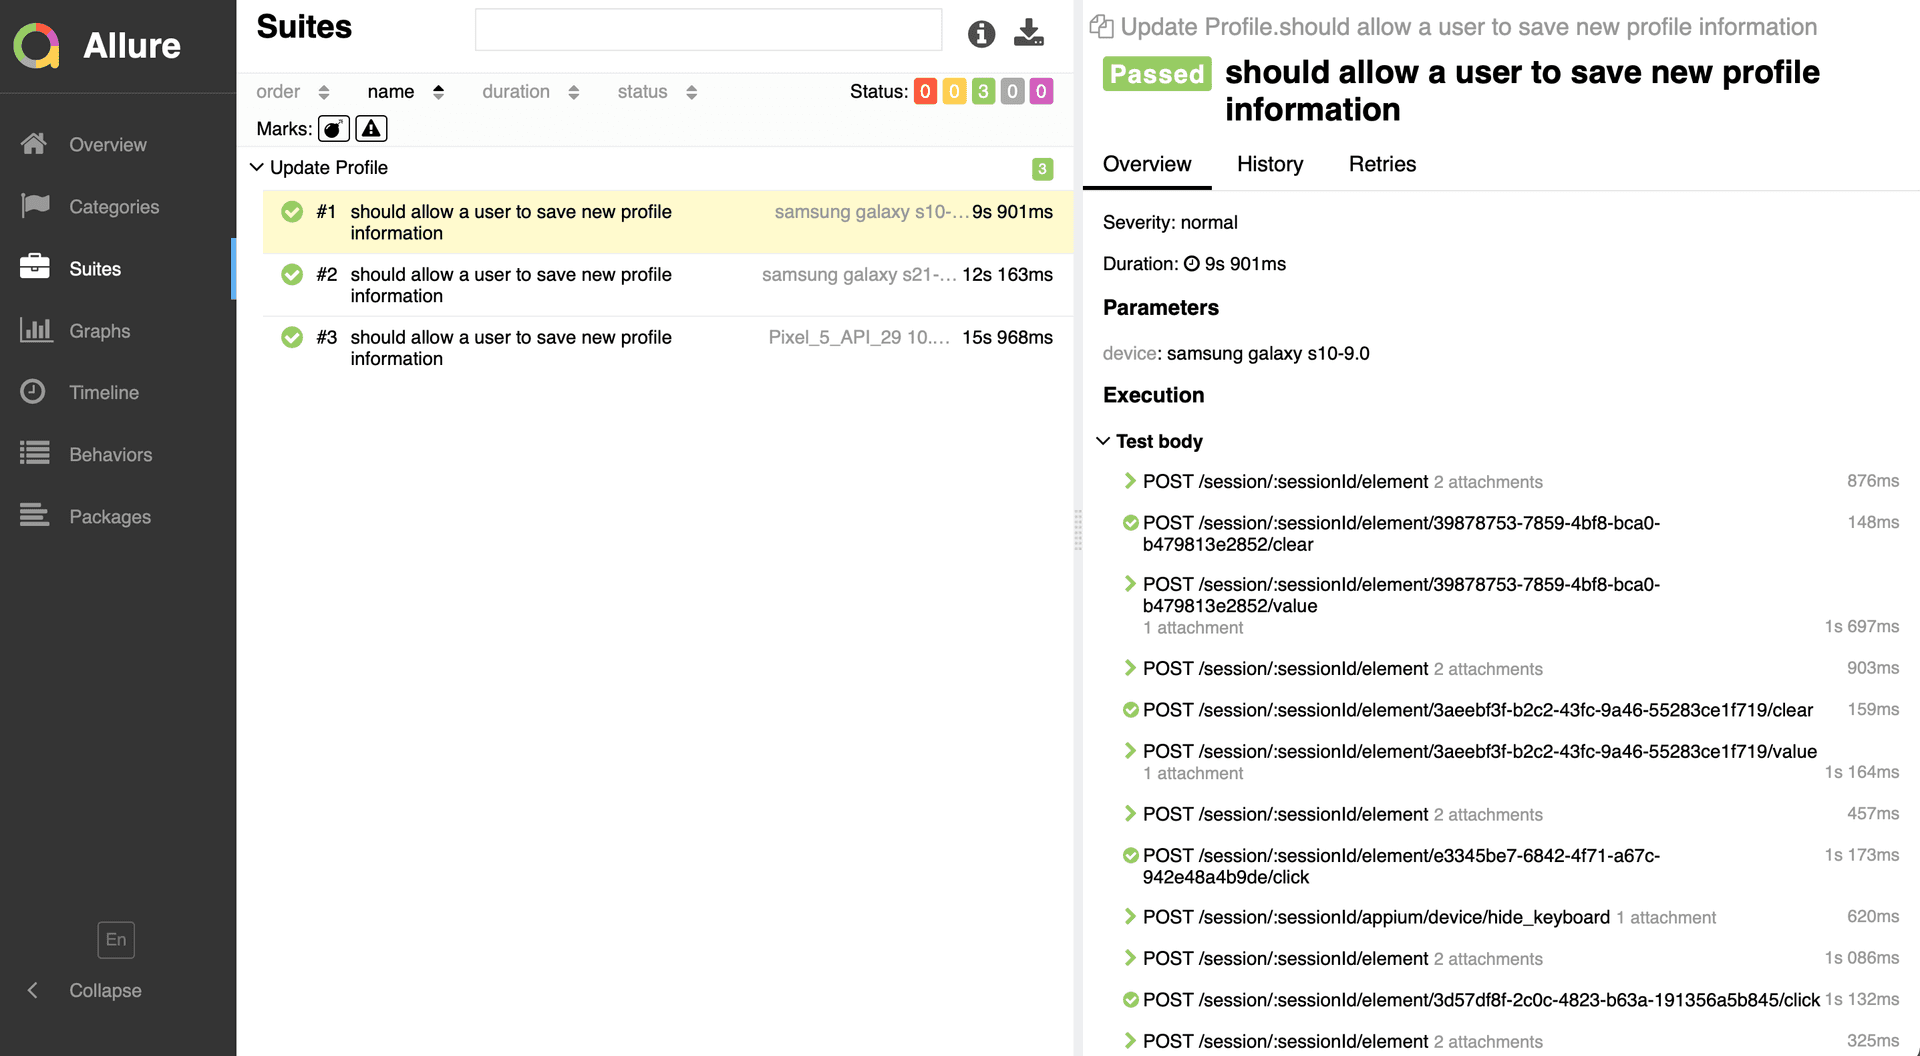
The previous screenshot shows the report generated with the Allure Reporter. The screenshot displays the "Suites" view, but there are other views we could select on the left side of the screen such as "Categories" and "Graphs".
Run Tests on Multiple Devices via BrowserStack
In the previous section, we tested the application locally using one emulator. However, we can enhance our testing efforts by simultaneously testing applications on multiple devices using BrowserStack. BrowserStack allows you to remotely test applications on countless combinations of real devices, browsers, and operating systems. BrowserStack is a paid service, but you can try a free trial version. For the native Android application we are testing, we will use BrowserStack's App Automate service.
To get started, we will create a BrowserStack specific configuration file:
import { config } from '../wdio.shared.conf'

config.specs = ['./test/specs/**/*.spec.ts']
config.exclude = []

config.user = process.env.BROWSERSTACK_USERNAME || 'BROWSERSTACK_USERNAME'
config.key = process.env.BROWSERSTACK_ACCESS_KEY || 'BROWSERSTACK_ACCESS_KEY'

config.capabilities = [
  {
    device: 'Samsung Galaxy S21',
    os_version: '11.0',
    app: process.env.BROWSERSTACK_APP_ID || 'BROWSERSTACK_APP_ID',
  },
  {
    device: 'Samsung Galaxy S10',
    os_version: '9.0',
    app: process.env.BROWSERSTACK_APP_ID || 'BROWSERSTACK_APP_ID',
  },
]
exports.config = config
In the previous code, similar to other files, we create a config file config/browserstack/wdio.android.bs.app.conf.ts that extends the shared config with a couple of new additions. First, we add a user and key key to the config object set equal to your BrowserStack account's "username" (BROWSERSTACK_USERNAME) and "access key" (BROWSERSTACK_ACCESS_KEY). You can set these secure values as environment variables on your computer. Next, we create two objects inside the capabilities array to specify the various devices we want to use to test the application. The app key set to BROWSERSTACK_APP_ID is the value provided when you upload your application's .apk file to BrowserStack. When you create your account, the "Getting Started with App Automate" provides clear instructions.
Once everything is configured to run the test, we can create another package.json script specific to running tests on BrowserStack:
"wdio.browserstack": "wdio ./config/browserstack/wdio.android.bs.app.conf.ts",
When we run the test from the command-line with npm run wdio.browserstack, we receive the terminal's typical pass/fail results. In addition, we can also view test reporting data, including a video of the test run on BrowserStack:
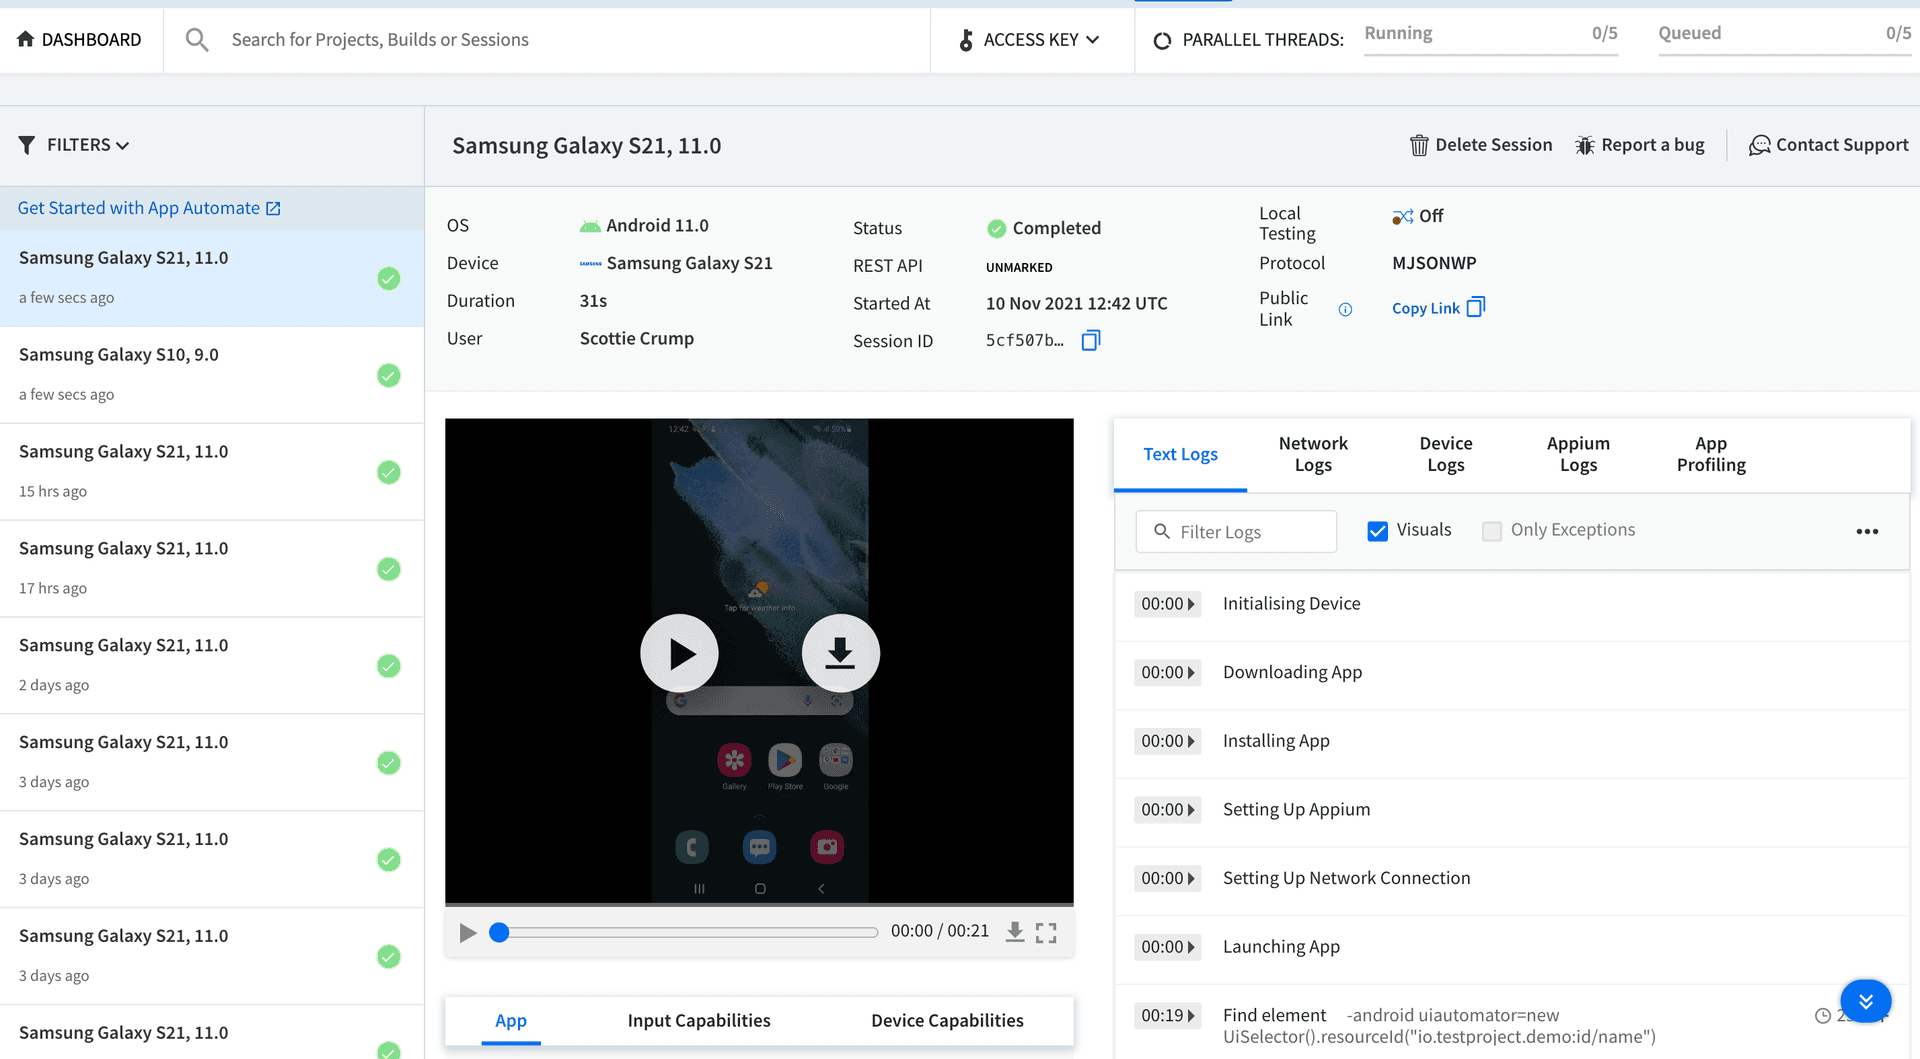
The previous screenshot shows data related to the test run, such as the steps that occurred each second of the test, a downloadable video recording, and device specifics.
Run Tests via Jenkins CI Server
We can run our tests on Jenkins, a well-known Continuous Integration and Continuous Delivery (CI/CD) server. We will use Jenkins to install our application and execute the script to run our tests on BrowserStack. This section aims not to provide step-by-step instructions on downloading and starting your own Jenkins server. However, download instructions are found here. Once you have Jenkins up and running, you will also need to install the NodeJS plugin to add support for running npm commands.
We will create a Jenkinsfile at the project root to instruct Jenkins on how to run our application code:
pipeline {
  agent any

  tools {
    nodejs "node14.18.0"
  }

  stages {
    stage('Build') {
      steps {
        sh 'npm install'
      }
    }
    stage('Test') {
      steps {
        sh 'npm run wdio.browserstack'
      }
    }
  }
  post {
    always {
      junit 'junit-report/*.xml'
    }
  }
}
We created a Jenkinsfile using the Declarative Pipeline syntax, outlining a pipeline to execute commands at specific times in the previous code. In the tools section we specify that we're using the nodejs plugin labeled as "node14.18.0". The pipeline contains two stages: 'Build' and 'Test'. In the 'Build' stage, we tell Jenkins to run npm install to install the application code. In the 'Test' stage, we tell Jenkins to run npm run wdio.browserstack to run the test on BrowserStack. Finally, after the stages complete, we tell Jenkins to save the junit test report as an artifact that we can view inside the Jenkins server. The pipeline documentation provides a clear explanation of pipeline creation.
Once we have created a Jenkins pipeline connected to our application either locally or via the online repository link (e.g., Github) we can click "Build Now" in Jenkins to run the tests and see associated output:
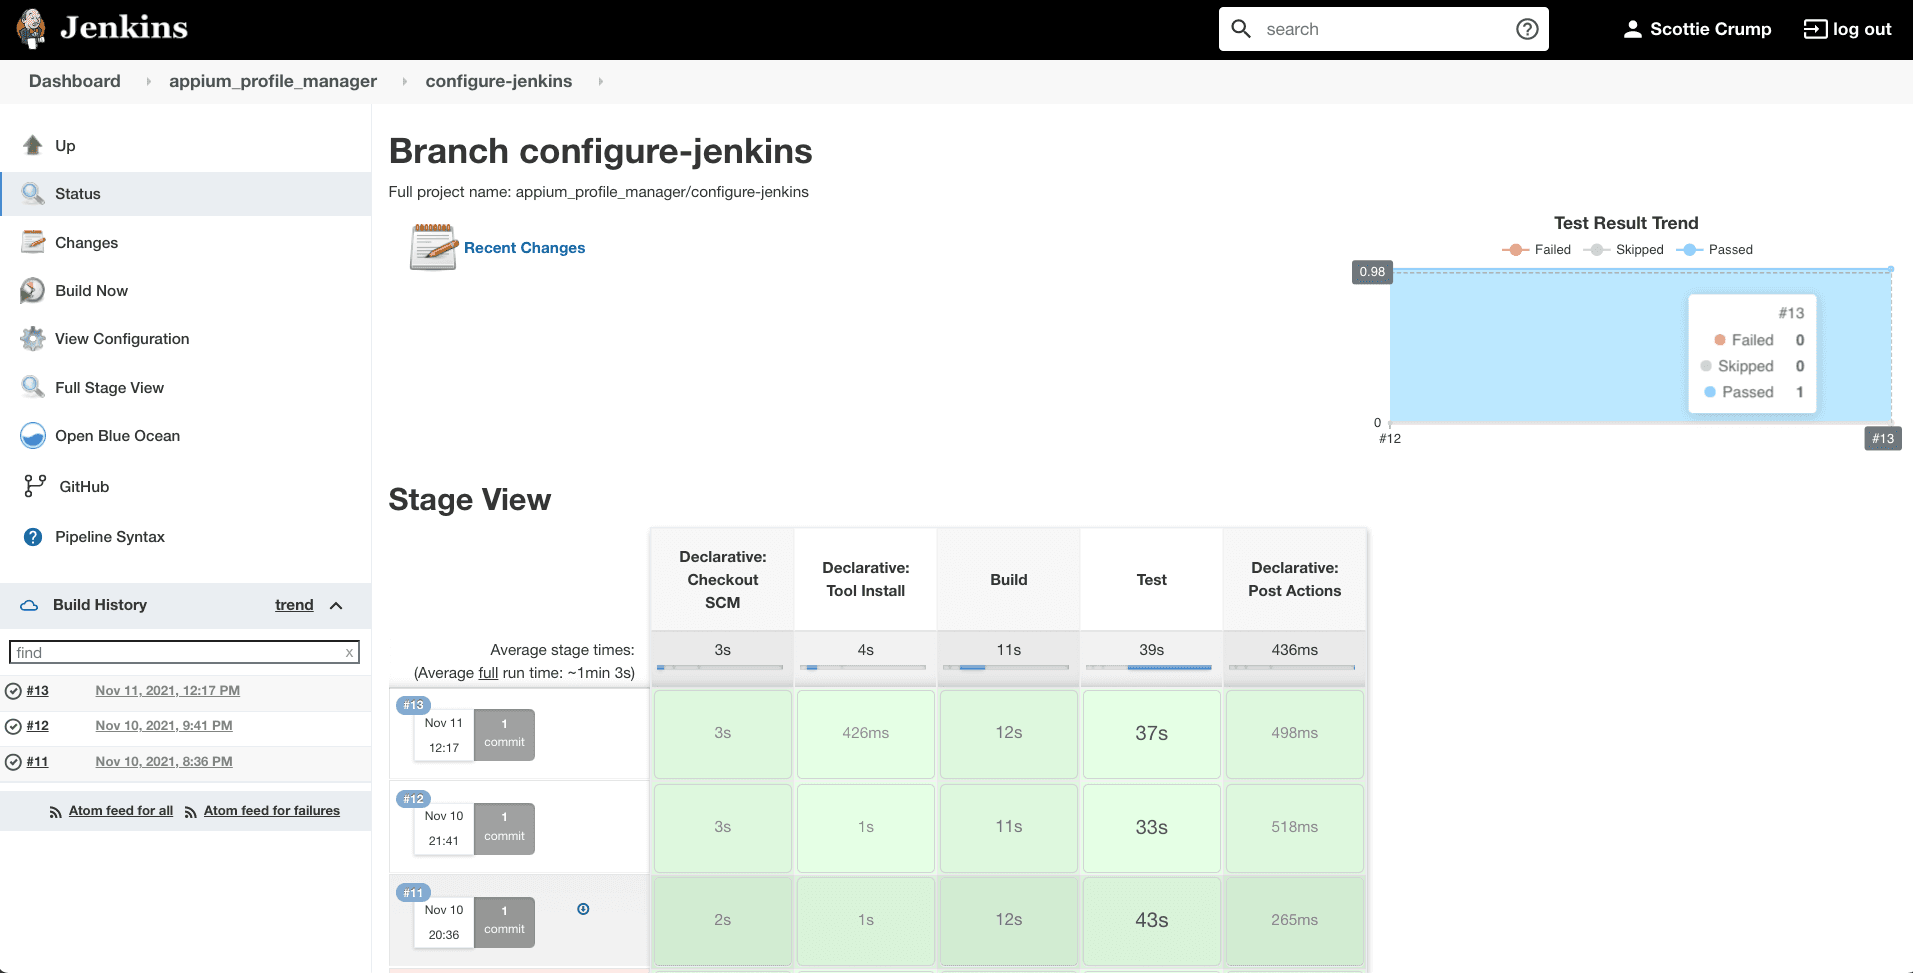
The previous screenshot displays data related to recent test runs. The graph on the top right side of the screen results from the junit reporter.
Part 2 Review
In review, first, we created test data to use in our test file. Next, we used Appium's Desktop app inspector to figure out how to select screen elements. Then, we organized our framework code inside page object classes. Afterward, we wrote a test for the update profile flow and ran it locally, via BrowserStack, and finally via Jenkins Server.