Test a Native Android App with Appium and WebdriverIO: Part 1

Photo by Matam Jaswanth on Unsplash
Project Overview
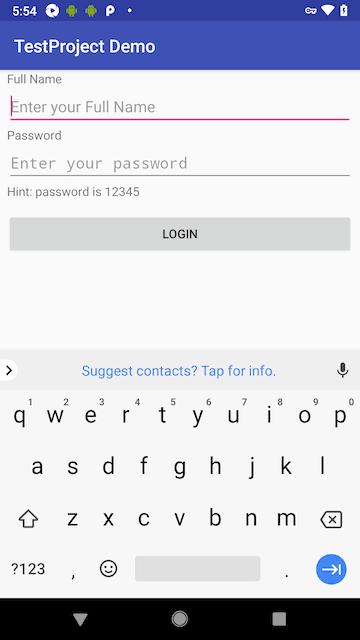
For this tutorial, we will test a native Android application. The application is a simple Profile Manager that allows users to log in, update their information, and log out. The login screen is as follows:
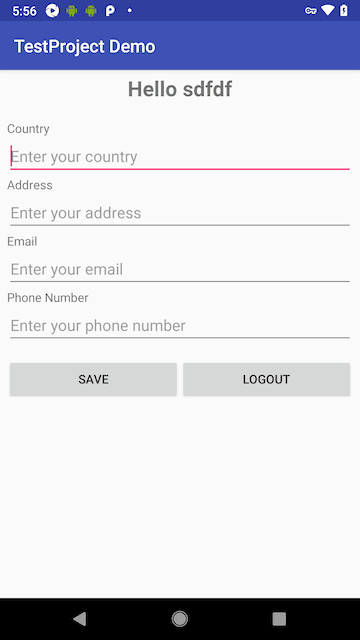
The profile screen is as follows:
We will use Appium, WebdriverIO, BrowserStack, and Jenkins to test the app. Test code will be written in TypeScript.
Project Setup
There are several dependencies necessary to test mobile applications using Appium. This tutorial aims not to provide step-by-step guidance to install and configure each dependency but to provide links containing appropriate steps.
Installing Appium
Use the following links to install Appium as a global dependency on your computer and the Appium desktop application: Getting Started with Appium, Installing Appium Desktop. Next, verify all Appium dependencies for Android and installed using appium-doctor passing in the --android option. As an additional resource, if you get stuck during any installation step, try the following resource: Install Appium on Mac.
Options to Start Emulators
Once you have Android Studio installed, one of the dependencies to test the app, and created emulators, we'll need a way to start an emulator without needing first to open Android Studio. One method is to open an emulator from the command-line using the emulator command. Another option is to install the start-android-emulator VSCode extension.
How to create a WebdriverIO project
WebdriverIO is the framework we will use to test the application. We can use the WebdriverIO Starter Toolkit to create a new project quickly and easily via the command line. A link to the final project source code will be provided at the end of the tutorial, but as a reference, the following options were selected when running the Starter Toolkit:
On my local machinemochaframeworkTypeScriptcompiler- accept the default test spec location option
allureandjunitreportersappiumandbrowserstackservices- accept the default option for
base url
After installing all dependencies on our machine and generating starter code for our WebdriverIO project, next, we can add configurations, test data and start writing tests.
Configuration File Setup
We will create three configurations (config files) for the project in the config directory.
Creating a Shared Config File
First, we will create a base configuration file wdio.shared.conf.ts that all other config files will extend:
const currentDate = new Date()
const timeStamp = `${currentDate.getDate()}-${
  currentDate.getMonth() + 1
}-${currentDate.getFullYear()}_${currentDate.getHours()}.${currentDate.getMinutes()}.${currentDate.getSeconds()}`

export const config: WebdriverIO.Config = {
  specs: [],
  capabilities: [],
  logLevel: 'info',
  bail: 0,
  baseUrl: '',
  waitforTimeout: 10000,
  connectionRetryTimeout: 120000,
  connectionRetryCount: 3,
  services: [],
  framework: 'mocha',
  reporters: [
    [
      'junit',
      {
        outputDir: 'junit-report',
        outputFileFormat: function () {
          return `${timeStamp}.xml`
        },
      },
    ],
    ['allure', { outputDir: 'allure-results' }],
  ],
  mochaOpts: {
    timeout: 3 * 60 * 1000, // 3min
  },
}
In the previous code, we created several base configurations. First, timeStamp generates the current date and time to label each report after test runs. Then, inside the config object, specs is a placeholder array to be overwritten by specific config files. The logLevel key is set to the default value 'info'. The bail key is set to 0, meaning all tests will run even if other tests fail. The baseUrl key is set to an empty string since we're testing on a native app. The waitforTimeout key is set to the default value 10000 to wait for any waitFor* commands. The connectionRetryTimeout key, used for browser driver responses such as hiding or showing the keyboard, is set to the default value 12000.
The connectionRetryCount key, used to retry connections to the Selenium server, is set to the default value 3. The services key is assigned to an empty array to be overridden by specific config files. The framework key, which defines the test framework to be used by the Webdriver test runner, is set to mocha, the option we selected in the WebdriverIO CLI tool. The reporters key is set to an array that includes the junit and allure values we selected and the respective folders where reports will go. Finally, the mochaOptions. timeout key, used to throw an error to avoid endless running tests, is set to 3 mins.
Creating an Android Specific Config File
The second config file wdio.android.app.conf.ts will allow for running tests against Android specific settings:
import { join } from 'path'
import config from './wdio.shared.local.appium.conf'

config.specs = ['./test/specs/*.spec.ts']

config.capabilities = [
  {
    platformName: 'Android',
    maxInstances: 1,
    'appium:deviceName': 'Pixel_5_API_29',
    'appium:platformVersion': '10.0',
    'appium:automationName': 'UiAutomator2',
    'appium:app': join(process.cwd(), './apps/testProject.apk'),
    'appium:noReset': true,
    'appium:newCommandTimeout': 240,
  },
]

exports.config = config
In the previous code, first, we import the shared config file to add additional configurations to the object. Next, we set the specs key to an array with the path to the location of our test spec files.
Then, we create a capabilities array set to an array with the important information related to how our tests will run on the Android app. The platformName is set to 'Android' identifying the operating system to test. The maxInstances key represents the number of concurrent browsers to run simultaneously during tests (e.g., Safari and Chrome). The 'appium:deviceName' is set to 'Pixel_5_API_29', the mobile deice to use for testing. The 'appium:platformVersion' is set to '10.0', meaning the Android version we will use for testing.
The 'appium:automationName' key, set to 'UiAutomator2', allows us to select elements using the Android UI Automator API. The 'appium:app' key is set to the .apk file for our app to test. The join method allows the file to be located on any machine via the current working directory. The 'appium:noReset' key set to true tells Appium not to reset the app state before starting the test session. Finally, the 'appium:newCommandTimeout' key set to 240 (i.e., seconds) tells Appium how long to wait for a new command from the client before assuming the client quit and ending the session.
Creating a Local Appium Config File
The last config file to create wdio.shared.local.appium.conf.ts will allow us to run tests locally using the appium command line tool we globally installed in the Project Setup Section:
import { config } from './wdio.shared.conf'

config.services = [
  [
    'appium',
    {
      command: 'appium',
      args: {
        relaxedSecurity: true,
      },
    },
  ],
]
config.port = 4723

export default config
In the previous code, first, we import the shared config file. Next, the services key is to to an array that specifics 'appium' as the service for the first array index, and an object with command set to 'appium' to inform the test runner that we want to use the globally installed appium server for the second index. The relaxedSecurity key is set to true since we are running Appium locally and not exposing the Appium port to others on the internet. Read more about Appium security here. Finally, we set the port key for our running Appium server to 4723.
Part 1 Review
In review, we looked at the app we will test. Next, we installed all necessary dependencies to run Appium on our machine, complete with options for Android emulators. Finally, we created a starter WebdriverIO project and created custom configuration files based on our needs. Now that we have all the setup taken care of, we will finally test the app in the next part!