Creating Automated API Tests with Postman: Part 4

Photo by Phil Hearing on Unsplash
Generating HTML Reports
We can use Newman, a command-line collection runner for Postman combined with Newman HTML Reporter, to generate HTML reports after test runs. The easiest method to get up and running with Newman and Newman HTML Reporter is to install both tools globally:
npm install -g newman newman-reporter-htmlextra
We used the Node Package Manager (npm) to install the tools globally in the previous code snippet. The next step is to export our Postman collection and Postman Environment JSON files and save them to our repository. The final step is to add a script in our package.json file to run the collection and generate a report:
"test": "newman run postman_collection.json -e postman_environment.json --reporters=cli,htmlextra"
In the previous code snippet, we created a "test" script that tells Newman to run our collection with the environment data and generate a report in the terminal with cli option and HTML report with htmlextra option. When we execute the script, we should see a newman folder in the root of the project with an HTML file inside:
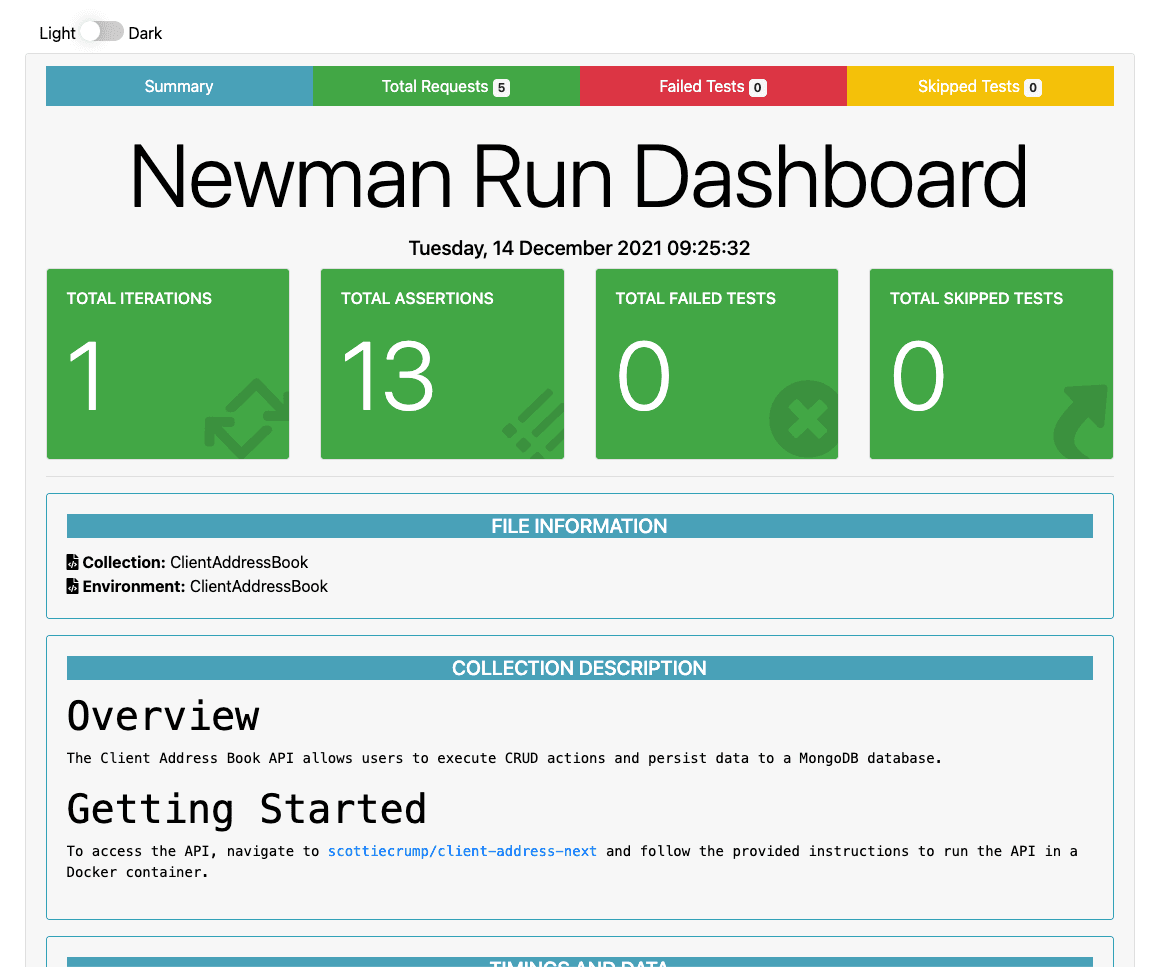
The previous screenshot shows a report providing data on how many times the collection ran, the number of assertions, failed tests, skipped tests, etc.
Running Postman in CI Environments
When using GitHub to store our repository, we can use GitHub Actions to run Postman tests. First, we can create a .github directory with workflows as a sub-folder. Next, we'll create a YAML file api-test.yml with instructions on starting our Docker containers and running the Postman collections.
Inside the file, first, we will specify a name for our workflow and a GitHub event to trigger the workflow:
name: postman-api-tests
on: push
In the previous code, the name of our workflow is postman-api-tests and will run anytime code is pushed to the repository in GitHub. Next, we will create jobs to run in the workflow. We will have one job, test-client-address-api that will execute several steps. The first step is to specify the machine to run the job on and start our Docker containers, similar to how we did in our Docker-compose file in Part 1. Since we are using Docker, we need to use Ubuntu as the machine:
jobs:
  test-client-address-api:
    runs-on: ubuntu-latest
    services:
      mongo:
        image: mongo
        ports:
          - 27017:27017
      client-address-app:
        image: scottiecrump/client-address-next:latest
        ports:
          - 3000:3000
        env:
          MONGO_URI: 'mongodb://mongo:27017/addressbook'
Then, we will specify a sequence of tasks (i.e., steps) to run. We'll use actions/checkout@v2 to checkout our repository so the workflow can access it. Then, we will use actions/setup-node@v1 to set up our workflow with Node version 14:
steps:
  - uses: actions/checkout@v2
  - name: Use Node.js
    uses: actions/setup-node@v1
    with:
      node-version: '14.x'
Then, we will install Newman and Newman HTML Reporter, run the tests, and save the generated report as an artifact using actions/upload-artifact@v2. Finally, we specify to keep the test report artifact (downloadable from GitHub) for five days:
- name: Install newman dependencies
  run: npm install -g newman newman-reporter-htmlextra
- run: npm test
- name: 'Upload Artifact'
  uses: actions/upload-artifact@v2
  with:
    name: newman-report
    path: newman
    retention-days: 5
Here is the complete file:
name: postman-api-tests
on: push

jobs:
  test-client-address-api:
    runs-on: ubuntu-latest
    services:
      mongo:
        image: mongo
        ports:
           - 27017:27017
      client-address-app:
        image: scottiecrump/client-address-next:latest
        ports:
           - 3000:3000
        env:
          MONGO_URI: "mongodb://mongo:27017/addressbook"
    steps:
    - uses: actions/checkout@v2
    - name: Use Node.js
      uses: actions/setup-node@v1
      with:
        node-version: '14.x'
    - name: Install newman dependencies
      run: npm install -g newman newman-reporter-htmlextra
    - run: npm test
    - name: 'Upload Artifact'
      uses: actions/upload-artifact@v2
      with:
        name: newman-report
        path: newman
        retention-days: 5
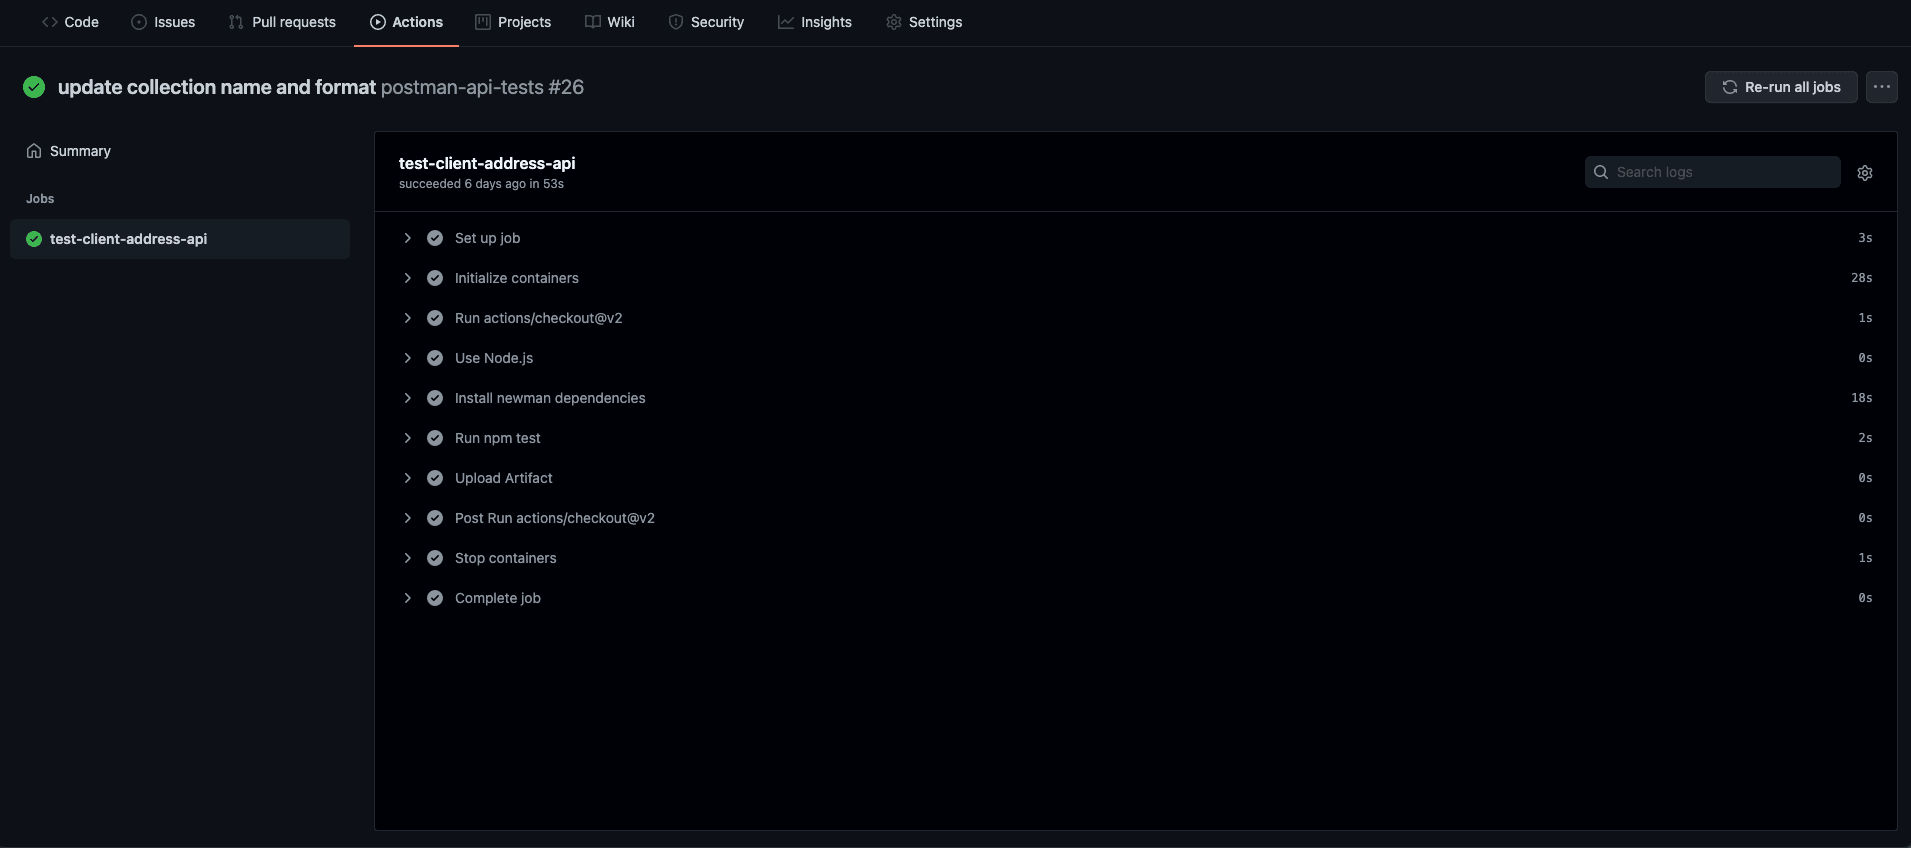
We can see the results of the job run by navigating to the "Actions" tab in our GitHub repository:
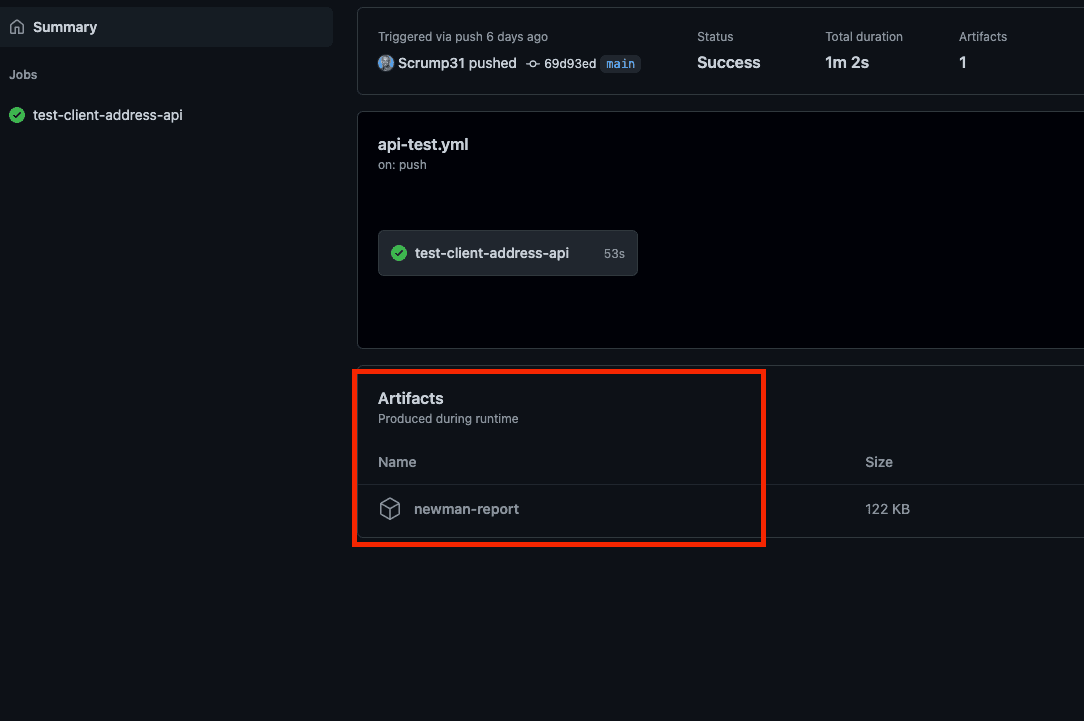
We can access the artifact by clicking "Summary":
Part 4 Review
In review, we learned how to generate HTML reports using Newman and Newman HTML Report. In addition, we utilized GitHub Actions features to run our test each time we push code to our GitHub repository.