Creating Automated API Tests with Postman: Part 2

Photo by Phil Hearing on Unsplash
Overview
In part two, we will start using Postman to test the POST Add New Client, GET Clients, and GET Get Client endpoints. All of our tests run against a "ClientAddressBook" Postman Collection:
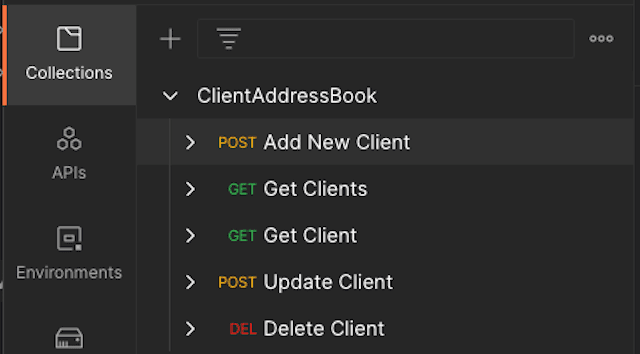
In the previous screenshot, we see the collection with all the individually created request endpoints.
Testing the POST Add New Client Endpoint
The POST Add New Client endpoint allows users to create a new client. To get started, first, will use the Pre-request Script tab in Postman to make a few collection variables that will run before our request:
const randomPhone = Math.floor(Math.random() * 1000000000)
const randomFullName = pm.variables.replaceIn('{{$randomFullName}}')

pm.collectionVariables.set('randomPhone', randomPhone)
pm.collectionVariables.set('randomFullName', randomFullName)
In the previous code, first, we used methods from the JavaScript Math object to generate a random number of ten digits in length to store in randomPhone. Next, we use the "replaceIn" method from the pm.postman object to return the resolved value of the Postman '{{randomFullName}}' dynamic value and assign it to the variable randomFullName. Then, we set both variables as collectionVariables accessible to any request in our collection.
Next, we will create an environment variable baseURL equal to http://localhost:3000, the URL of our running API application. Now that our pre-request and environment variables are set, we will make a POST request to /api/add-client:
{
    "name": "{{randomFullName}}",
    "email": "{{$randomEmail}}",
    "phone": "{{randomPhone}}",
    "address": "{{$randomStreetAddress}}",
    "company": "{{$randomCompanyName}}",
    "notes": "{{$randomLoremSentence}}"
}
In the previous code snippet, first, we used the collection variables created in the Pre-request Script to set values for "name" and "phone". Then, we used dynamic Postman variables to create values for "email", "address", "company", and "notes". The following is screenshot illustrates the request inside Postman:
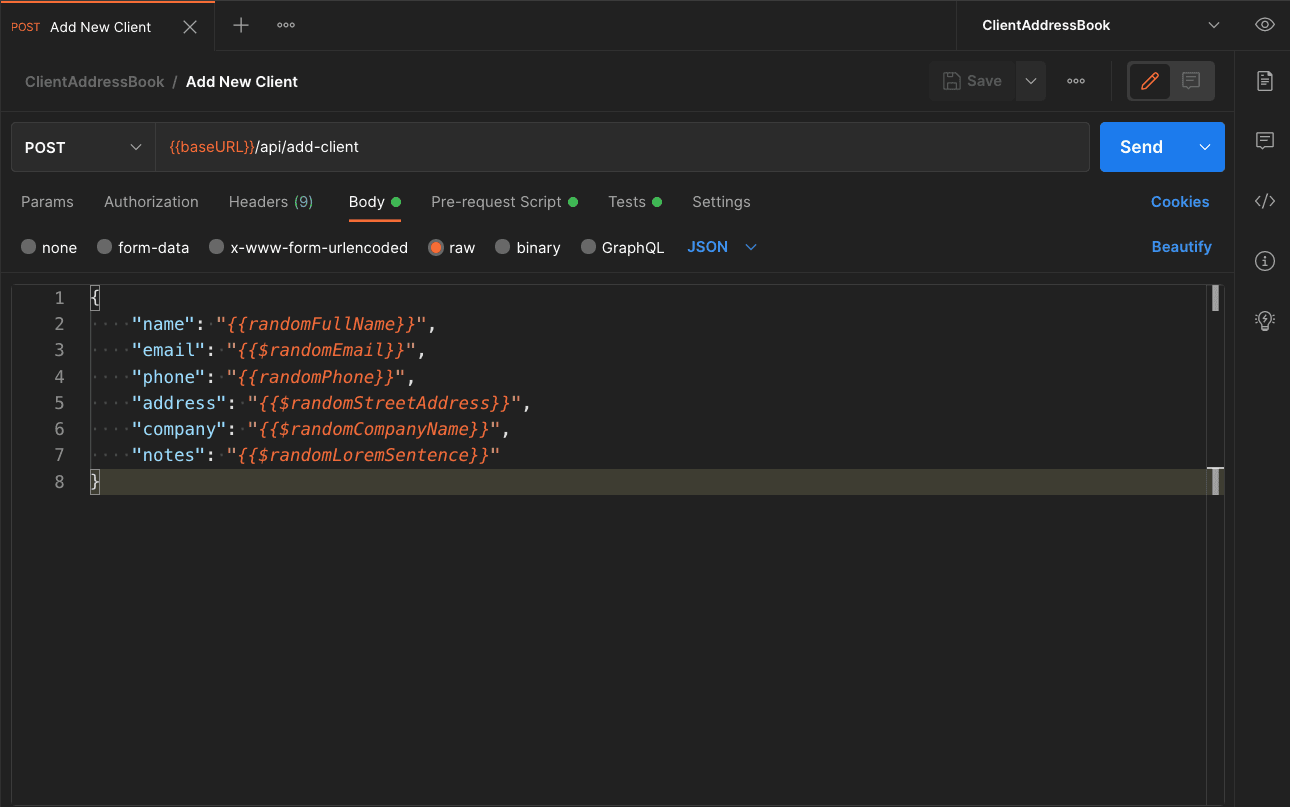
The previous screenshot illustrates the POST /api/add-client request inside the Postman application.
Writing the Test Cases
We will create three cases to verify the correct response from the API using the Tests tab in the Postman application. First, we will test that the response status code is 200:
pm.test('given POST request, returns 200 status', () => {
  pm.response.to.have.status(200)
})
The test "given POST request, returns 200 status" in the previous code verifies the expected status code.
Next, we will verify the response message:
pm.test('given new client, returns client added message', () => {
  const response = pm.response.json()
  const name = pm.collectionVariables.get('randomFullName')

  pm.expect(response.message).to.eql(`${name} successfully added`)
})
In the previous code, we first take the JSON response from the API, convert it to a JavaScript object, and store it in the variable response. Next, we get the value of the collection variable randomFullName that we set before making the request and store it in name. Finally, we assert the response message is equal to a string including the user's name just added.
The last test we will write will verify the schema of the response data:
const schema = {
  type: 'object',
  properties: {
    message: {
      type: 'string',
    },
  },
  required: ['message'],
}
In the preceding code, first, we create a variable schema set equal to a schema describing the expected shape and data type of the data received from the API. Then, we use the Avj JSON schema validator included in Postman to verify the schema:
pm.test('given valid POST request, response matches schema', () => {
  pm.response.to.have.jsonSchema(schema)
})
The test "given valid POST request, response matches schema" verifies the expected result in the previous code.
The following screenshot illustrates the final result inside the Postman application:
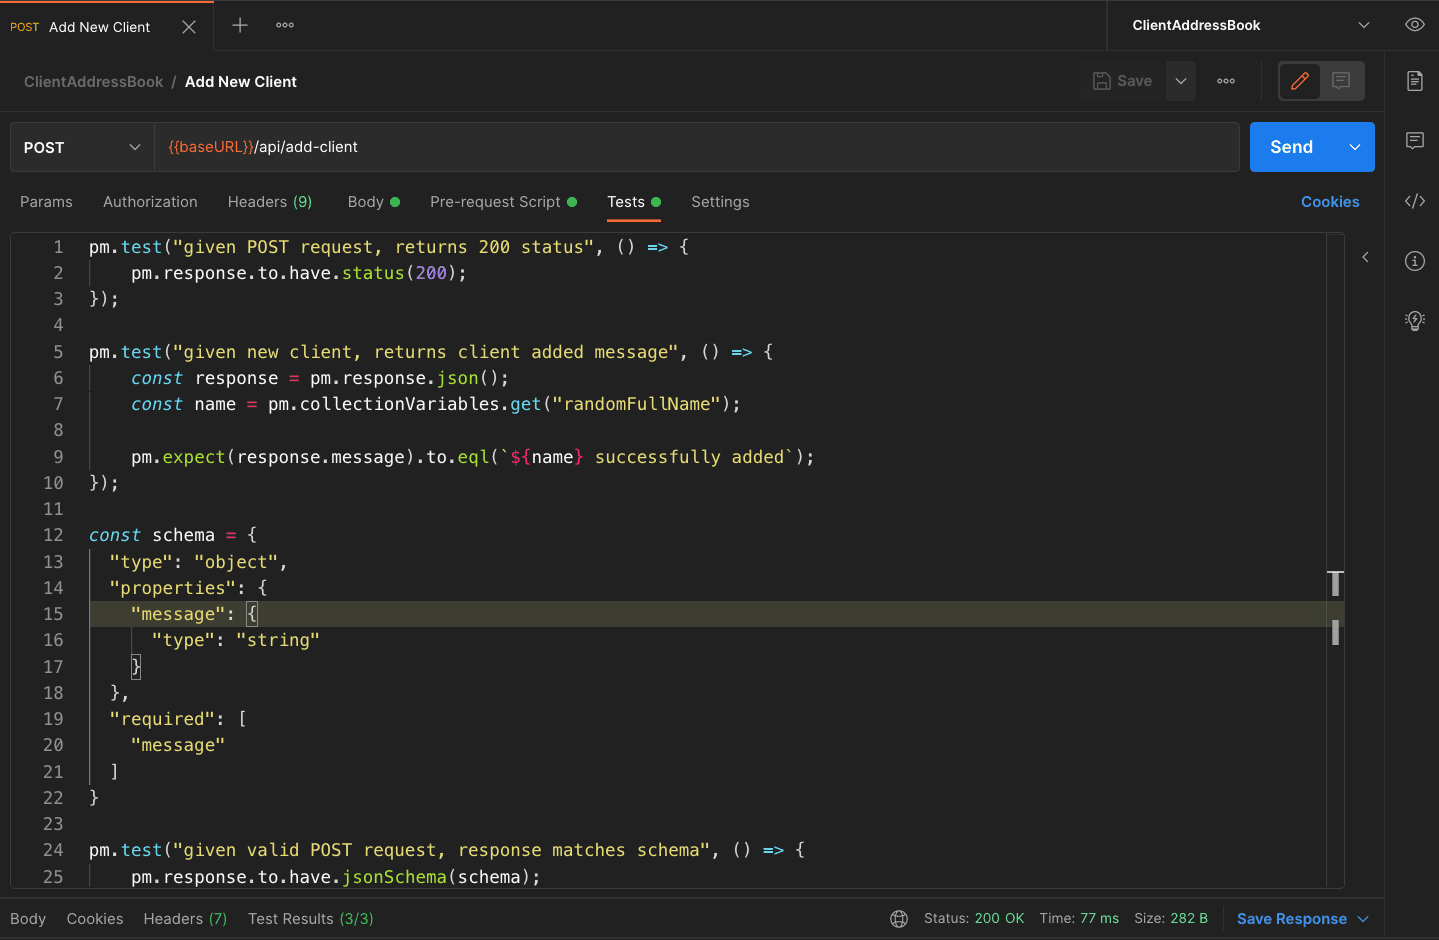
The previous screenshot shows all test cases and results at the bottom of the screen Test Results (3/3), indicating all test cases passed.
Testing the GET Clients Endpoint
The GET Clients endpoint allows users to retrieve all current clients stored in the database. To test the endpoint, we make a GET request to /api/clients and verify the response.
Writing the Test Cases
We will write two tests to verify the status code and the schema. First, inside the Tests tab first, we parse the response JSON into a JavaScript object in the response variable. Next, we will grab the id of the last client created and store it in lastAddedClientID. We will use the lastAddedClientID in a later request, so we store it as a collection variable:
const response = pm.response.json()
const lastAddedClientID = response.users[response.users.length - 1].id

pm.collectionVariables.set('lastAddedClientID', lastAddedClientID)
In the previous code, we grab the id of the last added client and store it in our collection variables. The test to verify the status code is identical to the /api/add-client test, so instead, we will focus on the schema validation:
const schema = {
  type: 'object',
  required: ['users'],
  properties: {
    users: {
      type: 'array',
      items: {
        type: 'object',
        required: ['_id', 'name', 'email', '__v', 'id'],
        properties: {
          _id: {
            type: 'string',
          },
          name: {
            type: 'string',
          },
          email: {
            type: 'string',
          },
          address: {
            type: 'string',
          },
          phone: {
            type: 'integer',
          },
          company: {
            type: 'string',
          },
          notes: {
            type: 'string',
          },
          __v: {
            type: 'integer',
          },
          id: {
            type: 'string',
          },
        },
      },
    },
  },
}
In the previous code, we create a schema variable equal to an object describing the shape of the array of users from the API. Validating the schema allows us to verify that the response data returns specific data types, including required data, without explicitly asserting the returned data. Next, we verify the schema against the API response:
pm.test('given GET request, response matches schema', () => {
  pm.response.to.have.jsonSchema(schema)
})
The test "given GET request, response matches schema" asserts the response data against the expected shape in the previous code.
The following screenshot illustrates the final result inside the Postman application:
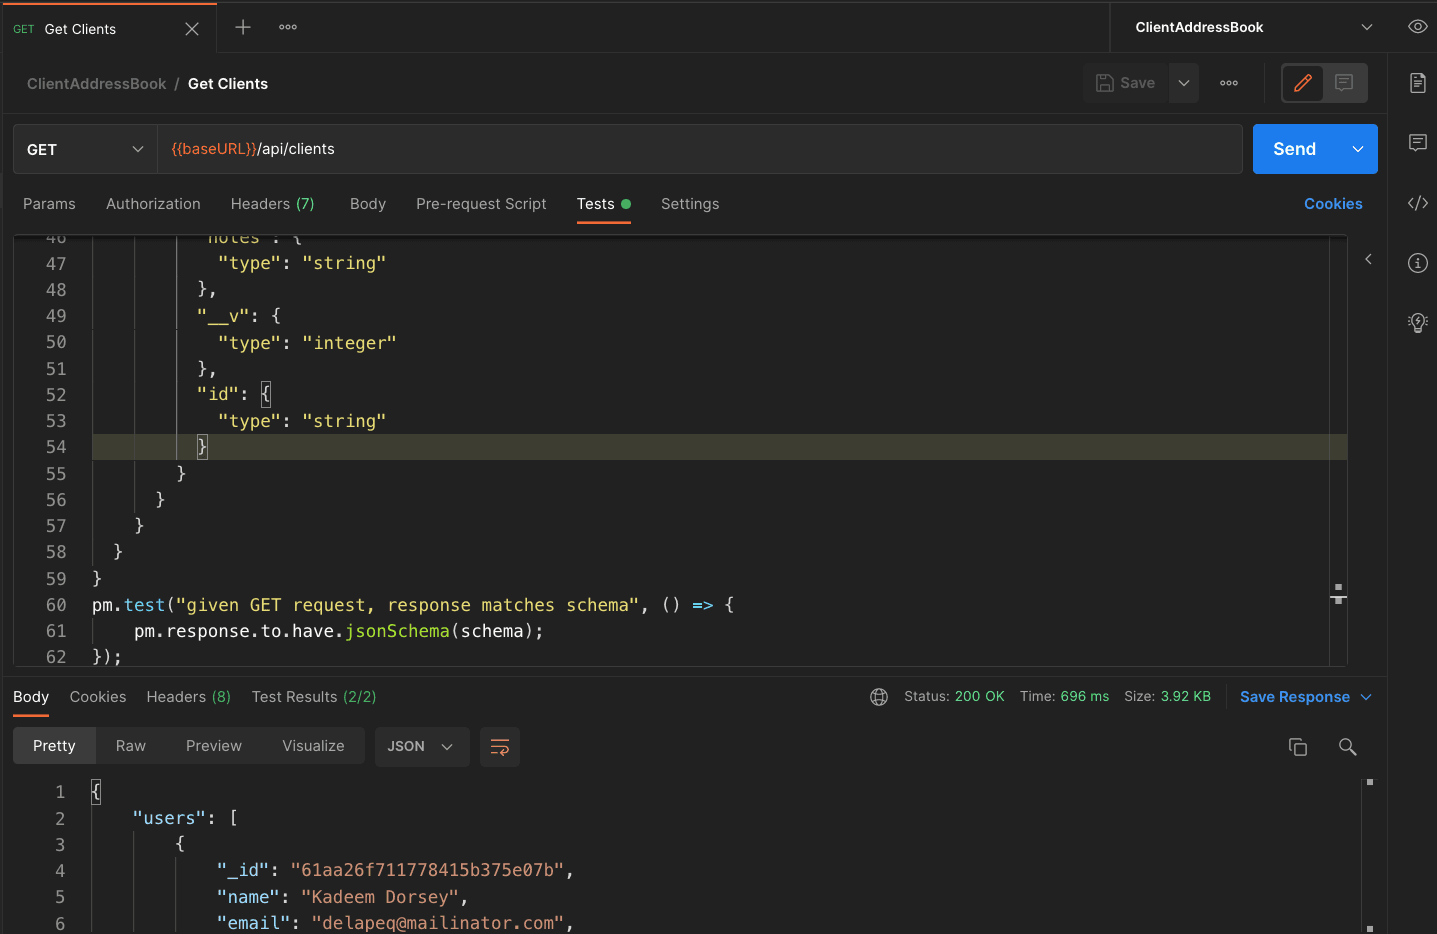
The previous screenshot shows the schema test case and results at the bottom of the screen Test Results (2/2), indicating all test cases passed. We can also briefly see the response data. (Note: Please see the final source code to view all test cases including the response status code test case)
Testing the GET Client Endpoint
The GET Client endpoint allows users to retrieve data for a single client. To test the endpoint, we need to make a GET request to /api/get-client?id={id}, passing in the client id as a query parameter using the Params tab in Postman. We will dynamically pass in the lastAddedClientID collection variable as the id when we make the request:
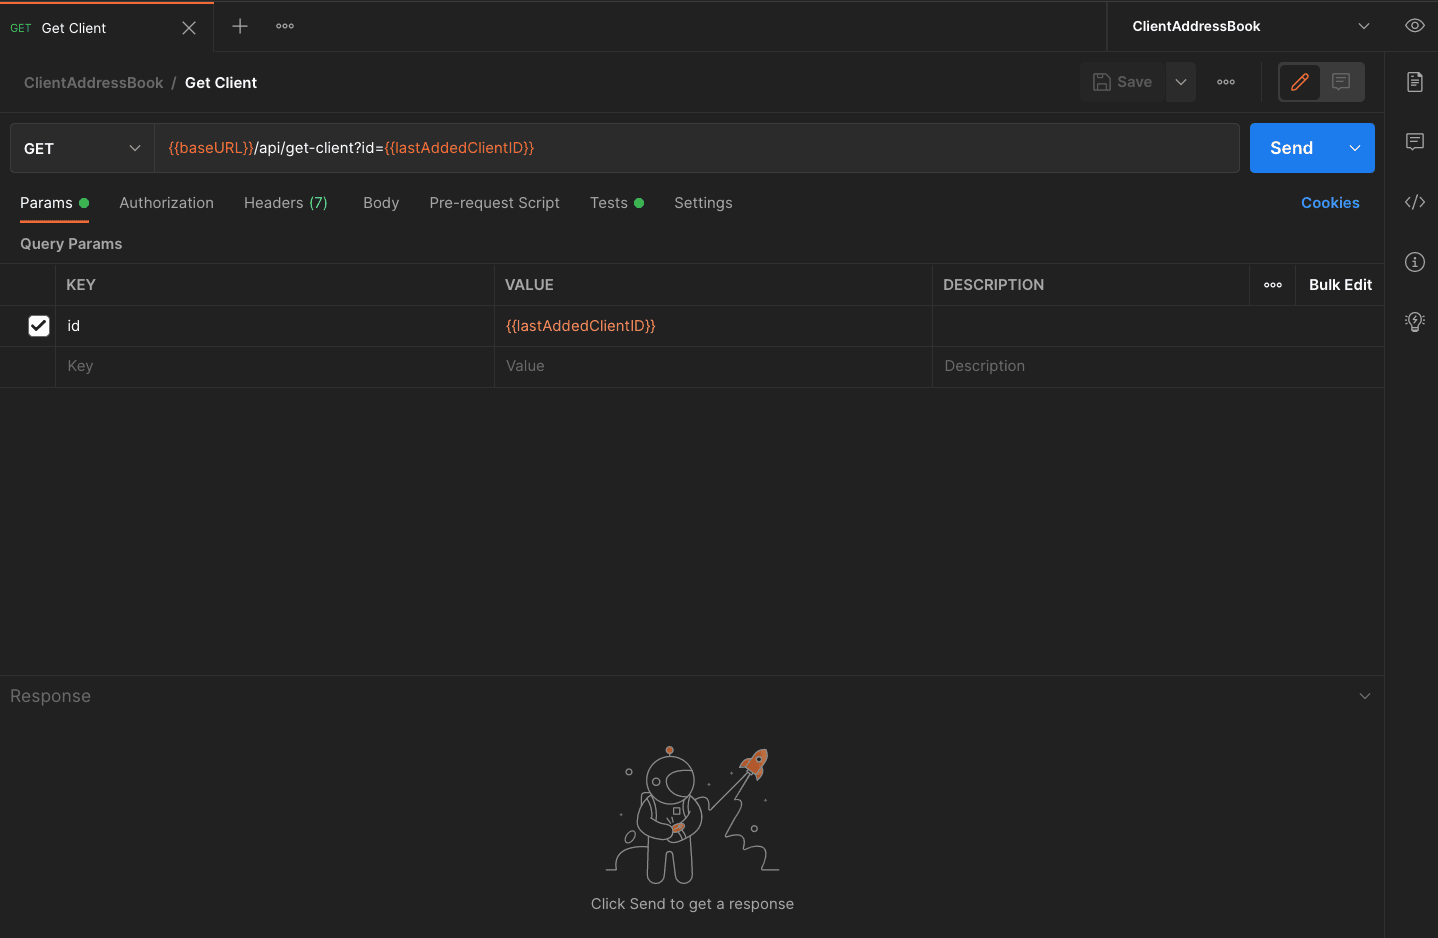
In the previous screenshot, we see the key id set to the value {{lastAddClientID}}.
Writing the Test Cases
Similar to test cases for the POST Add New Client and GET Clients test cases, we will verify GET Client's response status code (please see the final source code) and schema. Let's create the schema test case by first creating the expected schema:
const schema = {
  type: 'object',
  properties: {
    user: {
      type: 'object',
      properties: {
        _id: {
          type: 'string',
        },
        name: {
          type: 'string',
        },
        email: {
          type: 'string',
        },
        address: {
          type: 'string',
        },
        phone: {
          type: 'integer',
        },
        company: {
          type: 'string',
        },
        notes: {
          type: 'string',
        },
        __v: {
          type: 'integer',
        },
        id: {
          type: 'string',
        },
      },
      required: ['_id', 'name', 'email', '__v', 'id'],
    },
  },
  required: ['user'],
}
In the previous code, we created a schema object consisting of a user object with "_id", "name", "email", "address", "phone", "company", "notes", "__v", and "id". The "_id" and "__v" properties are auto-generated by the MongoDB Database. The "required" array lists all required properties. Similar to previous tests, we will use the Avj JSON schema validator to verify the schema:
pm.test('given GET request, response matches schema', () => {
  pm.response.to.have.jsonSchema(schema)
})
The test "given GET request, response matches schema" verifies the response against the expected schema in the previous code. The following screenshot illustrates the final result inside the Postman application:
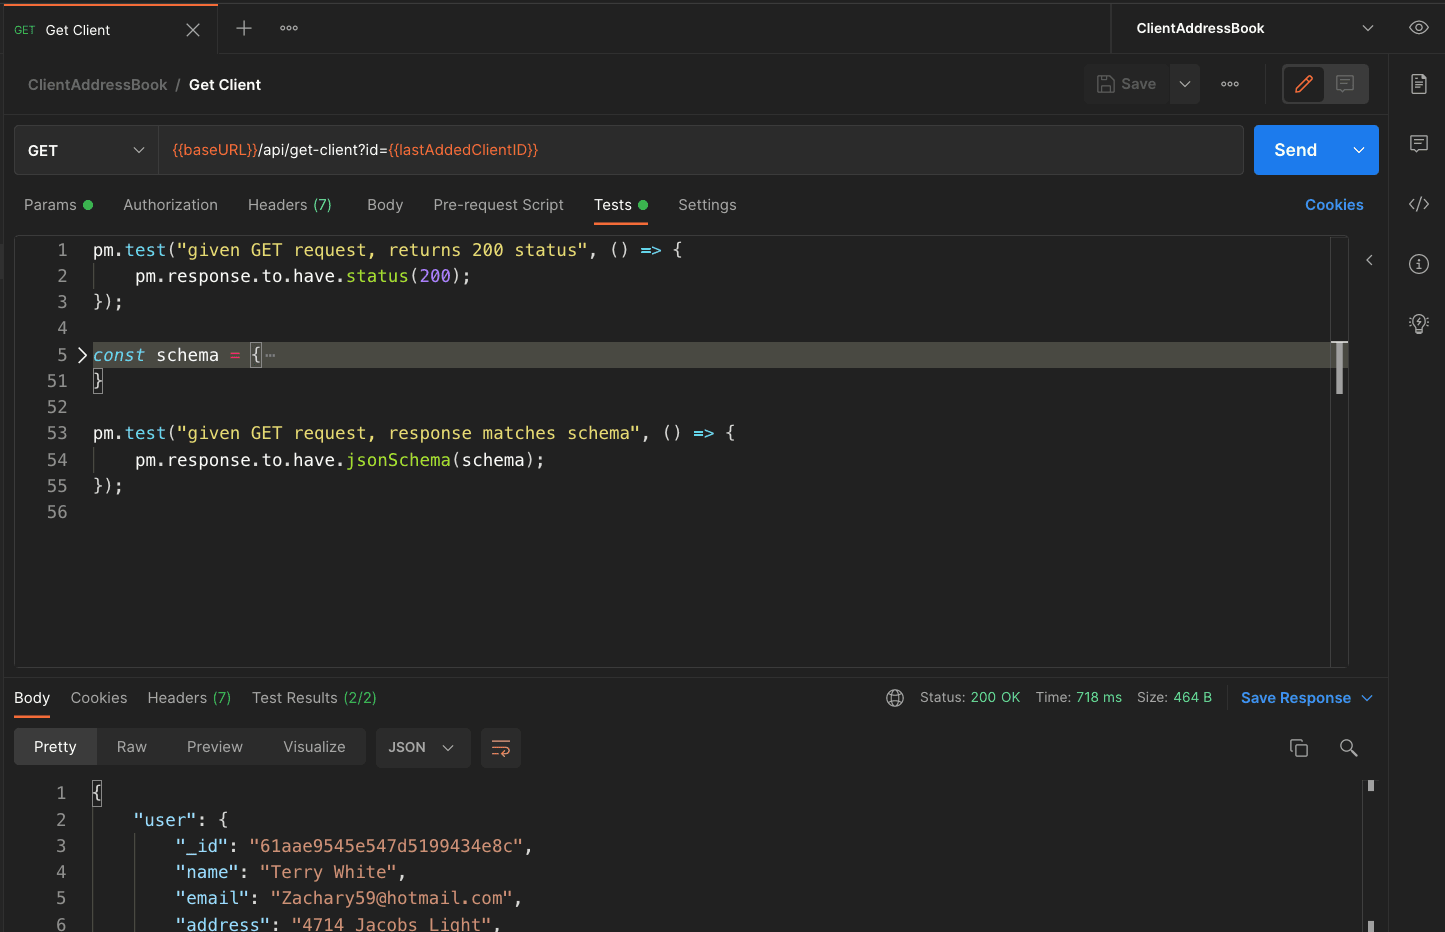
The previous screenshot shows the response status and schema test cases and results at the bottom of the screen Test Results (2/2), indicating all test cases passed. We can also briefly see the response data.
Part 2 Review
In review, we used pre-request scripts to create collections variables. Then, we made requests using dynamic data and tested the POST Add New Client, GET Clients, and GET Client endpoints, verifying the response status, body, and schemas. We also used dynamic data to set query parameters. Next, we will test the POST Update and DELETE client endpoints.